*Plus & Pro Plans Only
The materials you and your crew use on jobs must be added to the materials catalog before they can be selected. Before starting first add your expense categories if you haven't already.
To add a new material:
Material Information
- Go to Admin > Materials List.
- Click
 Add Material.
 - Check to make sure the Unit of Measure you want to use is available from the drop-down, otherwise to add it, click the Add button.
- Enter the Item Name/Number. This is the name shown on the selection list.
- The Description is automatically copied from the Item Name/Number field. This is the name that shows up on your reports and can be changed to be listed as something different.
- Enter a Manufacturer's Part # if applicable.
- Select the appropriate Unit of Measure from the drop-down.
- From the drop-down, select the Expense Category the item belongs to.
Material Options
Complete the material options (defined below) as needed and click Save.
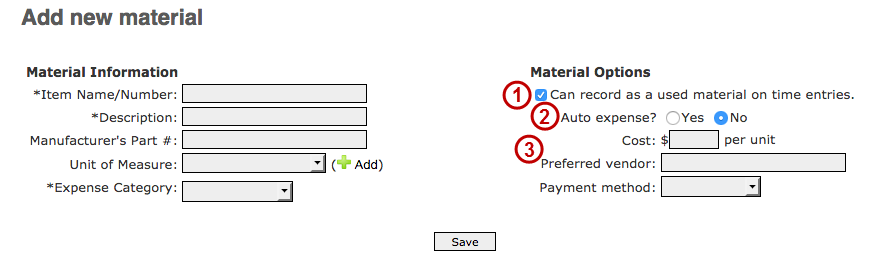
- Can record as a used material on time entries - allows crew to record that this material usage when entering work hours. By default it is checked, but to allow only direct entry uncheck.
- Auto Expense - for the materials which are allowed to be recorded on time entries (option #1), turning on auto expense allows default purchase information to be automatically assigned to the material. Leaving as No means that the material must first be expensed before it shows up on reports.
- Cost, preferred vendor, & payment method - these fields are required if auto expense (option #2) is turned on. Optionally you can complete so that these default values are pre-filled as purchase information when expensing the material.
Adding a lot of materials? Email support@buildkeeper.com for a template spreadsheet that can be directly loaded.